Introduction:
As customers expect an optimal experience every time they engage with your business, understanding where – and when – they may struggle on your site is crucial. The ability to readily identify customer struggle, and quickly rectify issues for a consistently optimized customer experience, can be further compounded by the number of channels and campaigns that may be involved in driving your business, where you are required to optimize many more pages and potentially new processes. But, how can you could know exactly when customers encounter struggle on your site?
Analysis Overview:
Enabling real-time alerting to be automatically notified when struggle events occur on your site can assist you with quick detection and analysis of customer struggles, allowing you to swiftly take corrective actions to deliver frictionless customer experiences.
Analysis Benefits:
Analysis Formula:
This customer experience analytics (CXA) formula will demonstrate how to create, use and manage alerts for defined struggle events on your site using IBM® Tealeaf® Customer Experience on Cloud (Tealeaf CX on Cloud), allowing you quick notification of and increased insight into customer struggles that you can then use to rectify issues and optimize customer experiences.
Consider the struggle events you want to closely monitor
Events are the foundation of alerts, as alerts are enabled to notify you when specific struggle events exceed a defined threshold on your site. You can set alerts for:
a. Struggle events you created using Struggle Analytics in Tealeaf CX on Cloud.
b. Events you have built in Event Manager to monitor struggle on your pages.
Depending on your web site design and what activities you would like to monitor, you could consider creating events to evaluate struggle or user confusion on your check out page, product page, registration page or shopping cart page, and more.
Set up alerts to monitor relevant struggle events
As configuring an alert requires some consideration on the threshold values and threshold intervals that are best to use for accurately monitoring your event activity, it is helpful to first let your events run for a short period of time. This will allow you to observe what event activity is within expected or typical range on your site, so that you can better configure your alert notifications to trigger when your event activity falls outside of normal range. However, if you are launching a new page (i.e. campaign or promotional page), a new process (i.e. registration), or perhaps launching into a new market, you may want to set up alerts right away to notify you of any immediate struggles or issues users encounter.
Alerts are created and monitored from Alert Manager in Tealeaf CX on Cloud, and alert notifications are based on:
Select Alert Manager from the left navigation (see first image below) and click “Add a new alert” that appears in the middle of the screen (see second image below) or click “+ New Alert” in the upper right (see third image below.) The basic info screen for creating alerts will display.
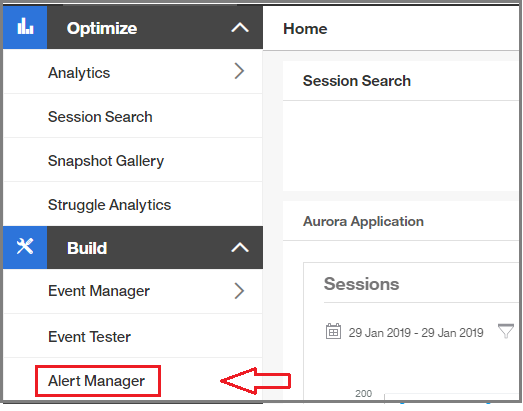 Alert Manager can be selected from the left navigation
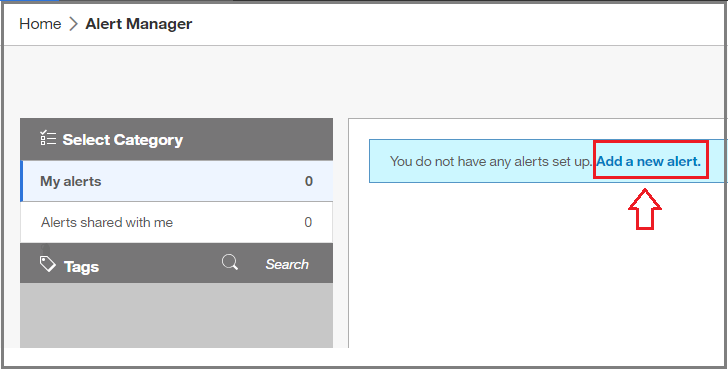 Within Alert Manager, click "Add a new alert"
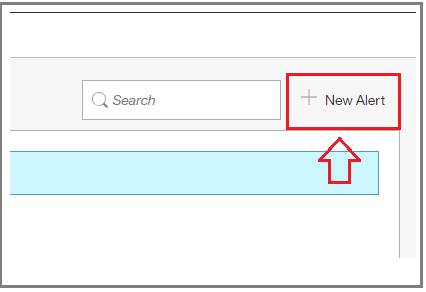 Or, click "+New Alert" in upper right of screen in Alert Manager
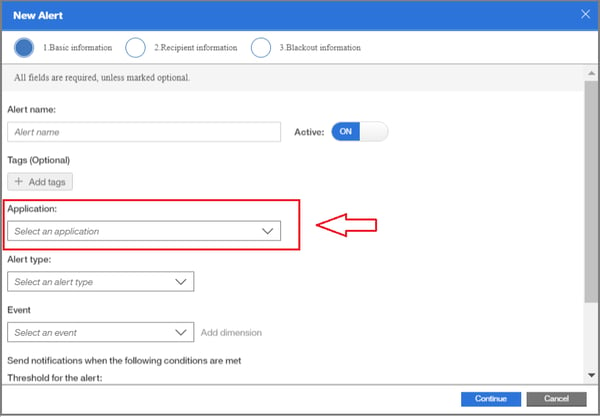
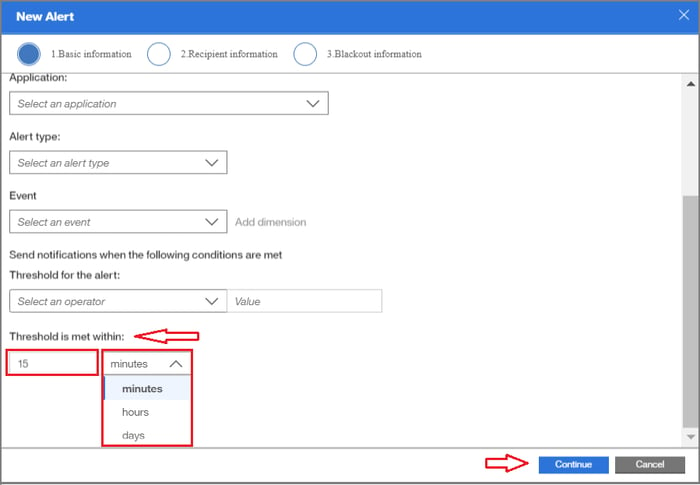
1. Enter a prescriptive alert name and ensure active switch is toggled to on, as shown below.
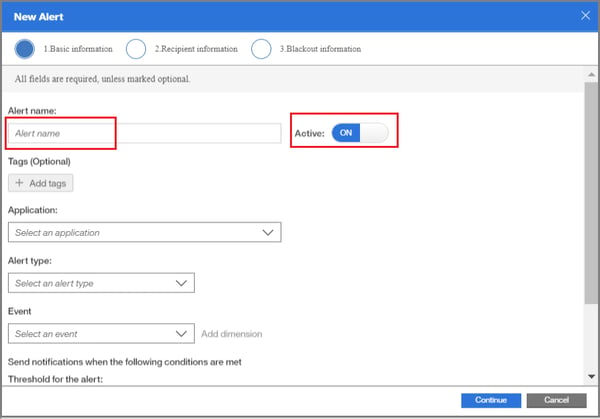 Basic information screen to set up alerts
2. Select the application, as shown below, where you want to collect the alert data.
3. Next, select an alert type, as shown in image below. For alert type, there are several options to consider:
i. Average: Sends an alert notification based on the average of a numeric event value collected during the alert interval based on the threshold value
ii. Count: Sends an alert notification based on the event count as compared to the threshold operator and value.
iii. Maximum: Sends an alert notification if the numeric event value collected exceeds this defined maximum during the alert interval based on the threshold
iv. Minimum: Sends an alert notification if the numeric event value collected exceeds this defined minimum during the alert interval based on the threshold value
v. Ratio: Sends an alert notification based on the ratio of two events. You choose two events, one as the denominator and the other as the numerator. Alert notification is sent once the threshold has been met. The threshold is set as a percentage.
vi. Sum: Sends an alert notification based on the sum of a numeric event value collected during the alert interval based on the threshold value using the threshold operator.
The most common type of alert is typically count, as there are many events where a high or a low count could signal an issue with your site. For example, a high number of bounces from your check out page or a low number of counts to your landing page.
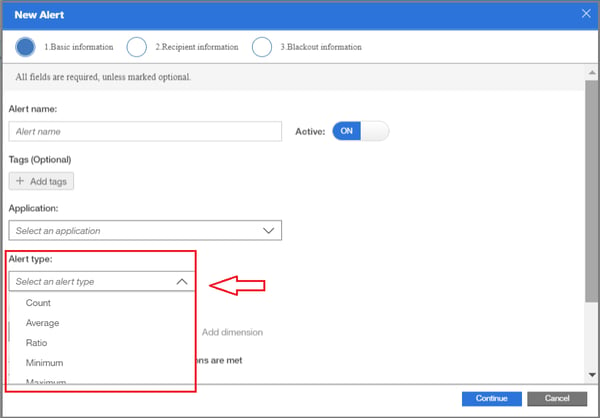 Select from several options for alert type
4. Select an Event, as shown below in red.
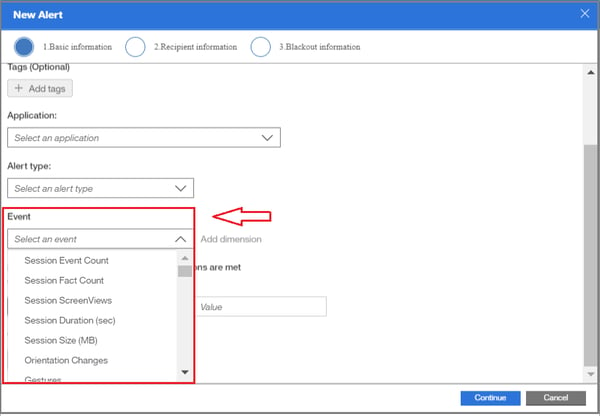
5. You have the option to click to Add dimensions to the event you want to monitor and select the dimension name and dimension value, as shown below in green.

Adding dimensions can be selected as an option
Additional considerations for configuring alerts
With the ability to select different alert types, as well as add dimensions to the event you would like to closely monitor, you have the flexibility to apply some creativity and uncover different activities that are taking place across your site and move beyond simply tracking page load issues or page not found errors.
Use case examples include:
For example, if you want to be alerted to possible fraudulent activity taking place on your site like a user entering multiple credit card numbers in the same session, you can configure an alert for events tracking the process on your checkout page. You would select ratio as the alert type and apply an event recording total credit card entries as the numerator for the ratio and an event recording the total sessions as the denominator.
For global operations, you can apply dimensions to the events you are monitoring to segment by location and receive alerts for struggles that may occur in particular geographies or regions. Or, perhaps you need to monitor influencers or referrals to your landing page as part of a new campaign. Applying dimensions to your monitored event can allow you to be notified, for example, if counts to your campaign landing page drop or fall below expectations for your campaign.
In addition, if you are implementing a new campaign or registration process, you could consider configuring alerts for notification on the potential use of invalid promo codes or login issues on your registration page. Monitoring abandoned cart rates or percentages is also helpful in alerting you to potential user struggles that could signal potential page or process issues.
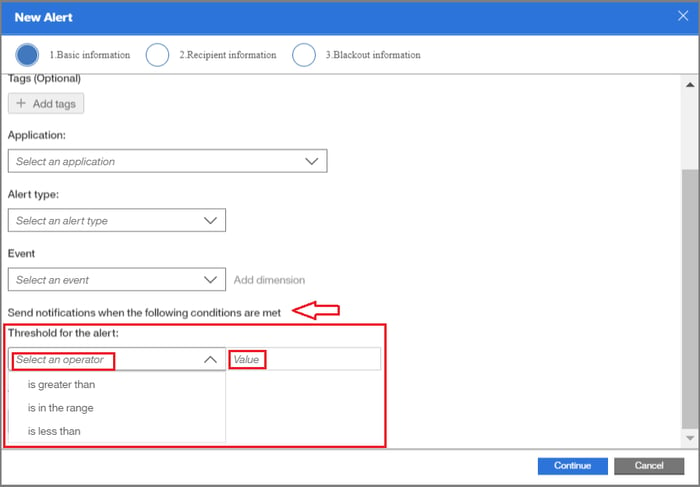
6. After selecting the alert type and event, select the threshold operation (i.e. is greater than, is in the range or is less than) and enter a threshold value for the event activity you are monitoring, as shown below. Again, you will want to consider what is within normal range for event activity on your site when deciding on these values.
7. After the threshold value is defined, select the alert interval time (i.e. between 1 and 1440 minutes), as shown below, and then click continue.
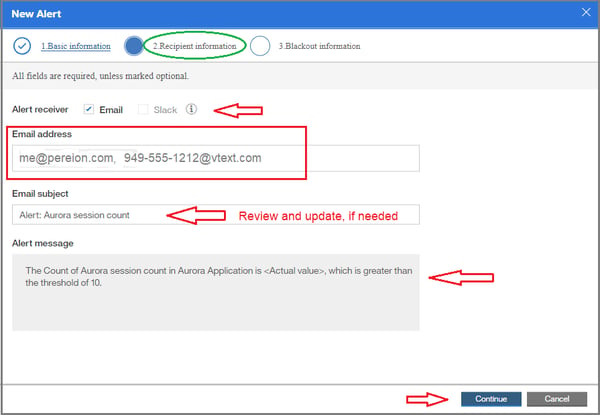
Once you click continue after your alert parameters are defined, the Recipient info screen is displayed.
1. Review the email address, email subject and alert message displayed, as shown below.
a. While the email address defaults to the email address of the person creating the alert, you can add additional recipients to receive alert notifications. You can also select to receive alerts via Slack rather than email.
b. Helpful tips:
i. Use Email to SMS Text gateway to send the alert notification email as a text message to your mobile phone or a recipient’s mobile phone.
1. For example, if you are a Verizon user and your mobile number is 949-555-1212, you can receive the email notification as a text by using [10-digit phone number]@vtext.com or 949-555-1212@vtext.com
ii. Review and update the email subject to ensure it is prescriptive and allows you to readily identify the alert notification when it is received. This is especially helpful if you are receiving multiple alert notifications.
Recipient info screen for alert notifications
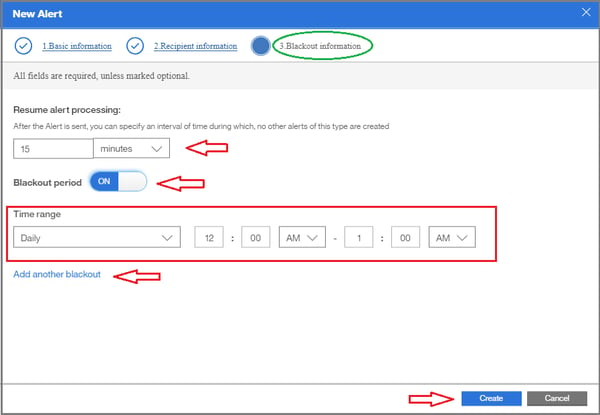
Click Continue once your Recipient info is confirmed and the Blackout info screen displays, as shown below.
2. After an Alert is sent, you can specify an interval of time during which no other alerts of this type are created as part of the Resume alert processing function.
3. You can also specify blackout periods during timeframes in which you may not want to receive alerts like during non-business hours, for example. To do so, toggle the blackout period switch to on and then specify the blackout period. You can also add additional blackout periods.
 Blackout information screen where you can specify blackout periods for alerts
It is also important to consider that very few systems will operate with 100% uptime or that your site will experience a struggle-free environment. So, be sure to check your alert configurations if activity seems unusually quiet.
Finally, complement real time detection of customer struggles with session replay technology in Tealeaf CX on Cloud for increased visibility into your customers’ behaviors and struggles to pinpoint where and why experiences are occurring, allowing you to quickly rectify issues and readily optimize your customers’ experiences.
Need more information? Request a consult with us by clicking here.
Click here to go back to the Tealeaf on Cloud Use Case Formulas for Success main page
